Sunday, December 18, 2011

Daphne, helping Don with mold work and more carving on the new work


Daphne is nearly finished but I am going to turn her so that she is facing south (she is now facing west). This will help me to finish up her right side since it faces north,it is always in the shadows, never getting sunlight. By turning her to the south I will be able to see both left and right sides of the sculpture in the same light. Also, she is elevated on six timbers to aid in work around the bottom of the piece. This has made it difficult to work on areas on the upper areas of the sculpture, particularly the leaves. Moving the sculpture closer to the ground will make it easier to finish these areas.


I am helping Don do the mold work on his tree of life sculpture. I will only touch on the steps of making a mold. He has posted a very in depth step by step on his blog http://restlessrocks.blogspot.com/ .


In the photo above,the leaf sections from the Tree of Life have been cut off and numbered. They are placed on little pedestals. They are then spray with a release agent.


Two layers of mold material are applied and then shims made of plastic sheet and sections of bubble sheet (which acts as register marks) are attached to the leaves with pins. The shims establish the part line of the mold.


Polyfiber is mixed with the mold material and is used to fill in the area between the shims and the leaves. As it is thick and sticky, it holds the shim to the sculpture and the pins can now be removed.


These are the leaves with 6 layers of mold material. They are now ready for the mother molds which will be made of plaster.


The tree, shorn of it's leaves will get it's mold next.
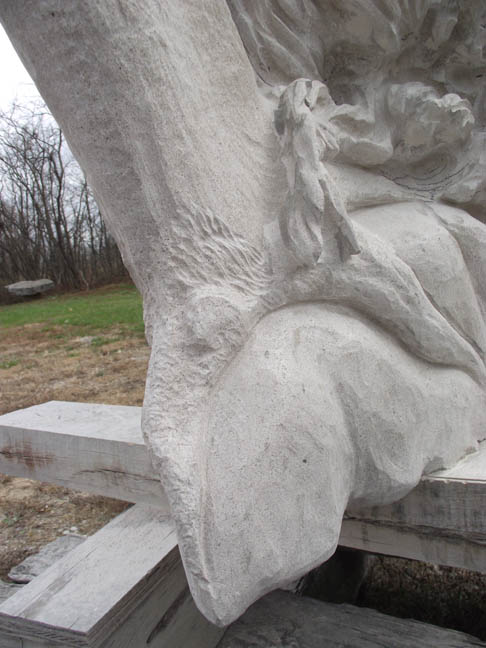
I spent some time working on the sculpture from the last post. I am removing stone from one side and ....
then the other. This piece is just for me, it's not a commission. Any ideas about what it is going to be?
What's this? A frost covered sunflower seed on the frost covered red truck. This years Christmas card.

Sunday, November 27, 2011

A departure

On rainy days when I can't work on Daphne I've worked on Ophelia. Now she is almost finished - there are just a few areas that need tweaking.


In the last blog posting I used the hydraulic chainsaw to remove sections of stone from a sculpture I will be working on in the near future, entitled Memory. As the weather will soon get cold I thought I should use the chainsaw as much as I can.


I have a sculpture planned for this stone and have roughed out a model for it. I have made marks (the white lines) with a small grinder on the areas that will need to be removed.


After I make a cut I put wedges into the cut and hammer them in until the stone cracks.


Then I use a pry bar to move them out of the way. Don took these last two shots.


I cut wide of the final form with the saw. I use the angle grinder to get closer to the form. It's not nearly as heavy as the chainsaw so I have a lot more control over the cut.


Here is a view from the side...


and from the front. Lots more work to go....


A wasp sippin soda...

Thursday, November 17, 2011

Finishing Daphne

There are many leaves to Daphne and I have been refining them. You can see that these leaves are too blocky and the edges are too hard.


I used a roloc and die grinder to refine them, this gives them more movement and a softer feel.


I use a roloc to finish around the base of the piece.


I begin putting a final texture to the Daphne's roots and bark.


I have been refining leaves as well as deepening shadows through the leaves. I have to go all around the piece looking for areas that need work.


Don used the hydraulic chainsaw to cut sections out of a block of stone for a new commission he is doing. He suggested I try the chainsaw to cut corners off of a block of stone that I plan on carving after I am finished with Daphne.


The saw requires water and so it's best to use it during nice weather. And the nice weather is running out fast, so I decided to bite the bullet ...

I have done a preliminary model of a woman 11 feet tall and laid out where it is in the stone. The section I am cutting is just above her head. It is best to leave too much stone than to risk cutting into the form.


I am cutting the section from behind the head to the shoulder, staying a few inches wide of where the shoulder will be.


The chainsaw is hydraulic. The power unit is gasoline powered, you can see a small part of it in the lower right corner. There are hydraulic hoses from the power unit to the chainsaw and a water hose which of course limits this tool to above freezing temperatures. The saw weighs 25 pounds and the hoses weigh a bit, but it wasn't bad at all.


Two cuts of stone. The chainsaw is an amazing tool. The cuts took about an hour total.
Now I'm looking around at other stones that need corners cut off....


A ladybug sippin' soda.


Thursday, November 3, 2011

Daphne continues, a Halloween party and waterfleas

I use a die-grinder to start deepening the shadows in Daphne's hair. The piece sat for years while I finished public commissions. As a result, the sculpture became dark from grime in the air. The lighter areas are where I have run the die-grinder, getting down to clean (and lighter) stone.

I use a slender diamond burr to cut around and define the ends of the fingers.


I smooth out the branches using a roloc which is an air powered sanding tool. Sanding discs of various grits are easily interchanged. I am using 120 grit. I will then go back and hand sand to remove flat areas caused by the tool.


I am working up a model using castilene. It comes in several versions from soft to hard. I am using the hardest version, its melt temperature is 160 degrees, and so it has to be warmed to be worked. However, it is so hard at room temperature it can be handled without smushing the forms. I used a heat gun to warm up the clay so I could model a rough draft and then use a metal wax tool over a candle flame to smooth areas and work small sections.


Castilene was developed by a local sculptor, Barney Bright and is the best clay for small models. It can also be burned out for one of a kind bronze sculptures.


Don and I were invited to our neighbors for their annual Halloween party...


The daughter of our hostess holds the inspiration for both their costumes.


Black is in this year! Great costumes guys!


Jeff, a friend of Don's, paid us a visit.


I use various burrs on die grinders to put a leaf texture to the interior of the piece.
My sister came to visit with her daughter and little boy. We took a walk near the property. That's Don walking with them.
I use a roloc (air sander) with 120 grit to smooth the branches. I will then hand sand to remove the flat areas left by the tool.
What is this a photo of? Water fleas. I was trying to take a pic of something on the water's surface and when I got close enough I saw all these tiny creatures (the white specs) swimming around.

Wednesday, October 19, 2011

Daphne continues, a watcher and a snake

I have been working on several proposals for public art opportunities this past week. That has taken some time away from Daphne, but here is some of the progress I have made... When I am carving an area, I mark on it with black china marker or crayon. On the hand I draw the high point of the fingers -it needs to slope off on either side and this helps me to better see the form. I also draw around the knuckles, shading areas that need deeper carving.

On Daphne's right hand I had the center too high, this made the hand look too narrow. Lots of times when carving stone if one area is too large the eye doesn't necessarily read it as too large, it will read adjacent areas as too small. Once I realized what was wrong and lowered that area the hand looked much better.


I have defined the area between Daphne's arm and the tree limb with a die grinder as well as getting a better shape around the hand and thumb. I still need to better define the ends of the fingers.


I define the edge between Daphne's belly and the bark of the tree using a die grinder, then an air sander followed by sanding by hand with 80 grit paper.


I am working Daphne's hair on her right side. I have been getting better movement and deepening shadows with angle grinders and die grinders.

I was working on the sculpture the other day when I could just tell someone was watching me.

I looked up and saw that I was right, I was being watched!


This praying mantis was on the sculpture, watching me so I moved it away so it wouldn't get hurt....


I nearly ran over this snake crossing the drive. I think it is a black rat snake. The day was fairly cool so the snake was pretty sluggish, it didn't give any trouble when I picked it up and set it over in the grass.


Wednesday, October 12, 2011

Daphne refinement and baby pictures my Nephew has a birthday

I photograph either side of Daphne from the front to check the detail from one side to the other.

This side needs a little more definition and dark shadows in the leaves.


I photograph the sculpture from all angles on a cloudy day to see if I need to darken shadows in any area. I see a few areas that just need the shadows to be a bit deeper.


Don is in the background tweaking a sculpture he has sold.


I found some of Daphnes baby pictures and I thought I'd share. Here she is 11 years ago. She was just started. The fact that she is a willow tree is but one departure from the Daphne myth. She was also born from an elephant. An elephant stone actually. The stone she came from was split from one that became a juvenile elephant holding a stick over his head. That sculpture was commissioned from my first elephant Ely. And it was the man who commissioned the second elephant that put Daphne into my head. He had told me about a painting of Daphne he especially liked and his description of her was so vivid she lived in my mind for a while. I tried to work her out in clay and in sketches but had no luck. Then, one day I happened to look at this stone in just the right way and realized that Daphne was inside.


Another view of Daphne 11 years ago. The sculpture has been carved direct, there has never been a model. I drew the outline on the stone and started there. I have worked small areas of stone away first with air hammers and angle grinders, later with a hammer drill and die grinders. I wanted to have as much movement as possible so I couldn't remove too much stone at once. I would look at it at various times of the day and when I saw an area I thought should be removed I would color in the area with black crayon. It has been a long slow process of getting her to her present state but I am very happy with her.


My nephew, Joe, just had his 6th birthday and celebrated it by hosting a party at 10 Pin Lanes Bowling Alley in Louisville Ky.


There was pizza and cake and then presents and then........
more bowling! It was the first time bowling for most and they all had a lot of fun.
I found this among the leaf litter. Not sure what it is (fungus maybe) but it's really interesting. Each one is about 1/2" across. It looks like tiny eggs in nests and the one on the right looks like the eggs are covered with a blanket of sorts. Strange!